

There are over 1.8 billion websites hosted around the world right now and we are heading towards 2 billion in another few months’ time.
Websites and blogs are considered the lifeline of the internet and search engines. Almost all the information you acquire through search engines is fueled by websites and blogs.
Surprisingly, starting a website or a blog has become a lot easier today than what it used to be a decade back. In this article, I will try to guide you through each step involved in successfully creating your own blog or website from scratch.
Here is the list of things we will cover in this guide:
- Buying Your Domain Name
- Choosing the Right Host
- Deciding Your Blogging Platform
- Setting Up WordPress
1. Buying Your Domain Name
Domain name is more like an address where people can find your blog or website online.
www.yourdomainname.com
It is highly recommended that you get a domain name that ends with .com because it is easy to remember for you and people who want to find you on the internet. Having said that, there are literally hundreds of extensions available for purchase now from different domain registrars.
These are some of the most popular ones:
- godaddy.com
- namecheap.com
- bluehost.com
- dreamhost.com
- hostgator.com
I personally prefer Namecheap.com. They are simple to navigate and manage your domain. And they don’t clog everything up with ten thousand up-sells (cough..Godaddy…cough)
2. Choosing the Right Host
After you are done with registering your preferred domain, you will need to purchase space to host your website. Almost all the domain registrars offer hosting options once you are done with registering the domain name.
Before choosing the right company to purchase your hosting, you need to consider three things.
Uptime: This refers to how long the servers where the files of your websites reside stay online or available for access. I highly recommend you choose a hosting company that has at least 95% uptime history.
Support: You will obviously want fast acting and professional support if something goes wrong.
Pricing: You definitely need a host that has fair pricing with no hidden costs.
There are broadly three types of hosting options you can choose from.
- Shared Hosting
- VPS Hosting
- Dedicated Hosting
We will go through each of these hosting options in little detail so that you can make an informed choice.
Shared Hosting
Most startup websites and blogs would do just fine with a shared hosting option. Shared hosting usually utilizes one big powerful server, but the server resources like RAM, Storage space, and the processor will be shared with other websites that will be hosted on the same server. For a low traffic and medium scale website shared hosting will be the wise and less expensive choice.
Virtual Private Server – VPS hosting
Virtual private server or VPS hosting is where the server will be split into different partitions and you will be allotted a unique partition where you will get a dedicated amount of RAM and Space. This will be a better option as your blog grows and starts to get more traffic.
Dedicated Hosting
Dedicated hosting is where an entire server will be allotted to your websites. You will be given the option to expand your RAM and Space needs based on your site’s traffic. Dedicated hosting is highly recommended when your blog starts to receive really high volumes of traffic each day or your website script demands a huge amount of resources to run seamlessly.
Now that you have a basic idea of each type of hosting, you can make your best choice based on your needs. I recommend going for shared hosting if you are starting an entirely new website and move up the ladder to VPS and Dedicated hosting as you get popular.
3. Deciding Your Blogging Platform
There are a number of blogging platforms to choose from, and most of them are free and opensource. Having said that, there are few paid options available as well like Wix, Squarespace which are easy and straightforward to use.
I will personally recommend using WordPress. It is the single most popular blogging and content management platform on the internet. You may be surprised to know that it powers almost 76% of the blogs on the web. It has a thriving community of users around it who are ready to help you with most problems you are likely to encounter while using it.
WordPress is an open source software, so anyone can alter, modify, and build upon its codes. Due to this reason and its overwhelming popularity hundreds and thousands of developers have gotten their hands on its codes and created numerous readymade solutions you might want on your website or blog.
4. Setting Up WordPress
There are a couple of ways to install WordPress on your server, the first one is using softaculous and the other one is using the manual method.
Softaculous
Most shared and VPS hosting comes with cPanel and Softaculous preinstalled on your server. If you have softaculous on your server, then installing WordPress is a piece of cake.
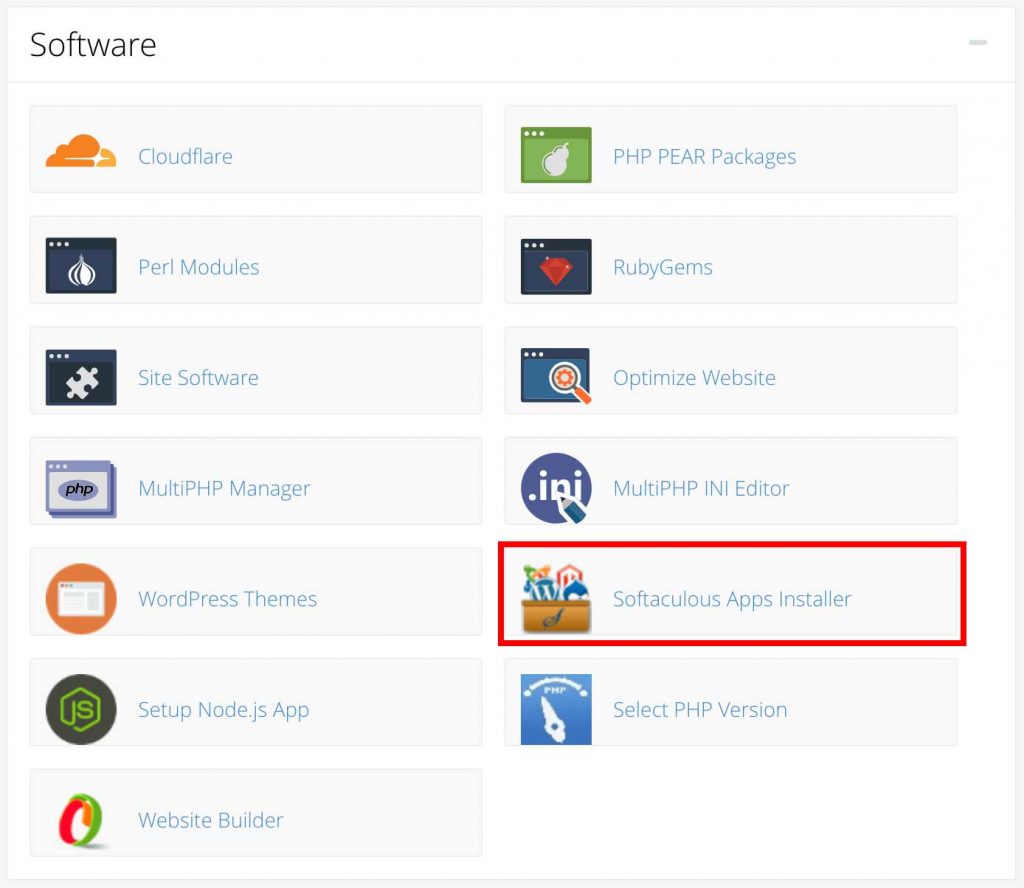
Click on the Softaculous Apps Installer option under the Software section in your cPanel
You will be taken to a screen as shown below.
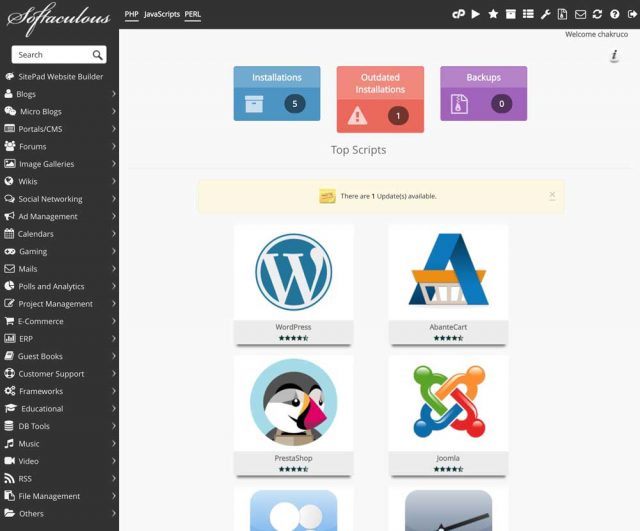
Here you will be shown the list of software packages, you can install using the program. Now under the blog category choose WordPress. Once you have chosen WordPress you will be provided with a form similar to the one shown below. Now it is just a matter of filling it up with needed details.
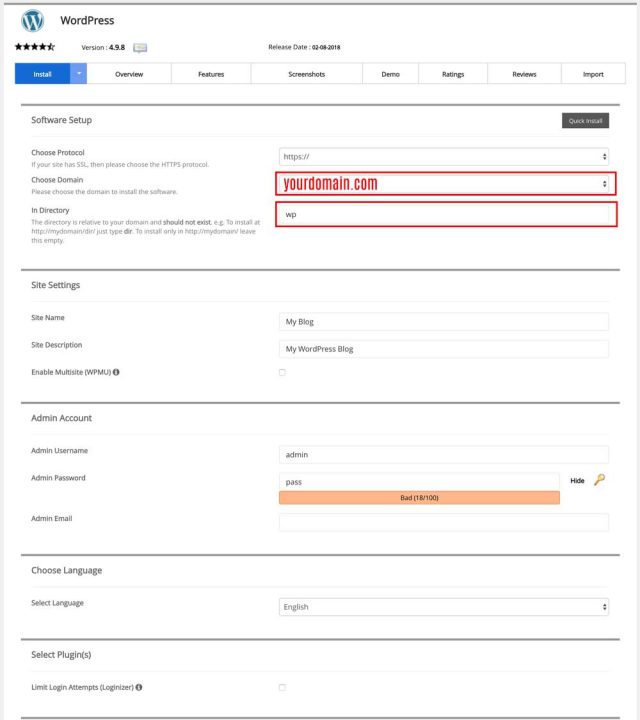
Choose the domain of your choice from the drop-down, and directory where you want to install WordPress in the first section. If you want to install WordPress on the home directory so that you can access it directly using the main URL (ex: http://www.domainname.com) then leave this space empty. Else, if you want your blog to be installed on a specific directory say “blog” then fill this field up with the name of the directory, so that it can be accessed using http://www.yourdomainname.com/YOURDIRECTORYNAME (ex: http://www.domainname.com/blog).
The rest of the sections are self-explanatory, just go ahead and fill them up with necessary details.
As a beginner do not get into Advanced options, leave it to defaults and move on.
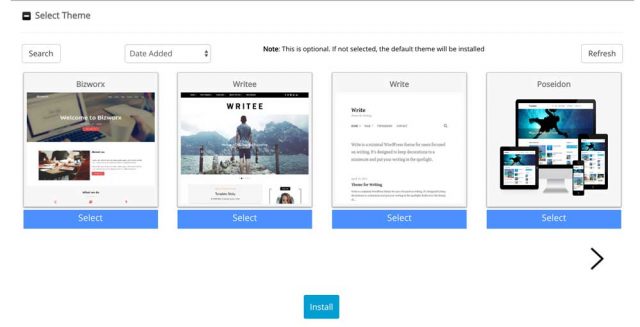
In the last section, you can select a theme that you want on your blog when you first log in. If you want to use a default WordPress theme then don’t select any theme and click install.
That’s it. If everything went well, you can now access your WordPress dashboard by using the URL: http://www.yourdomainname.com/wp-admin
Manual Method
Unlike softaculous, the manual method involves more steps and little complex in comparison. But, do not worry, I will try to make it look as simple as possible.
Firstly, you need to download the WordPress package from this link: https://wordpress.org/download/
After downloading the zip file of the package, you need to upload it to your server.
Uploading the WordPress package to the server
Step 1: Login to cPanel
Step 2: Click on File manager
Step 3: Get into Public_html
Step 4: Using the upload option on top, upload the downloaded zip file
Step 5: Once the upload is complete, use the extract option on top to unzip the file. After the extraction process is complete you should see a new folder called WordPress.
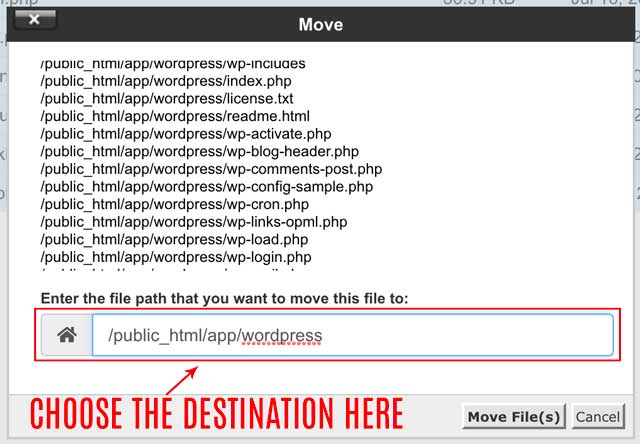
Step 6: Open the WordPress folder and select all files and click the move option on top and move all the files to the main location
Creating Database and connecting Database and User
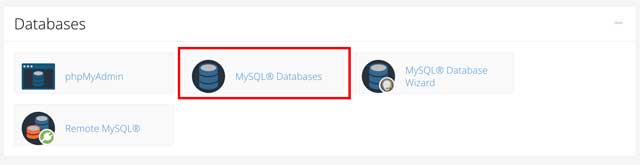
Inside cPanel locate MySQL Databases under Databases section and open it
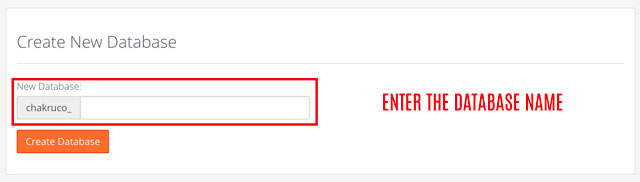
Once you are inside, you should see a little field called “Create New Database”. In this field enter the name of your database and click “Create Database” and your new database will be created.
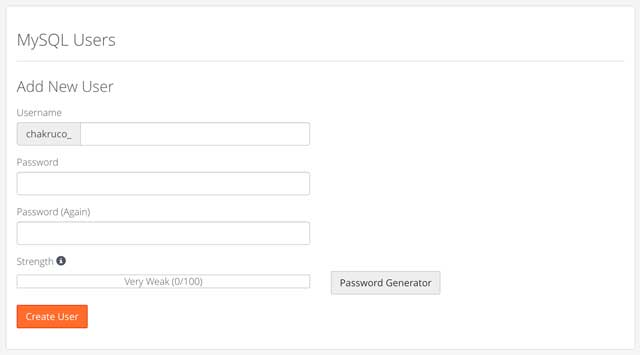
As you scroll down the same page, you should see another field called MySQL Users. Enter a name and password in the provided fields and create a new user.
Now that we have created a new user and database for the blog, it is time to connect the database and user together.
In the Add user to Database section, choose the database and user you have just created from the drop-down list and click add.
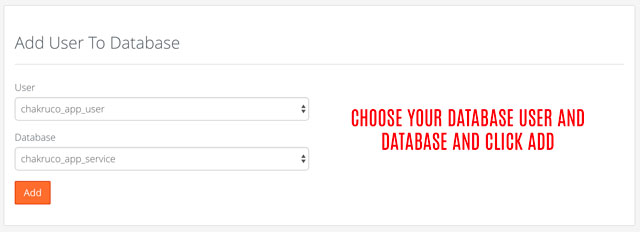
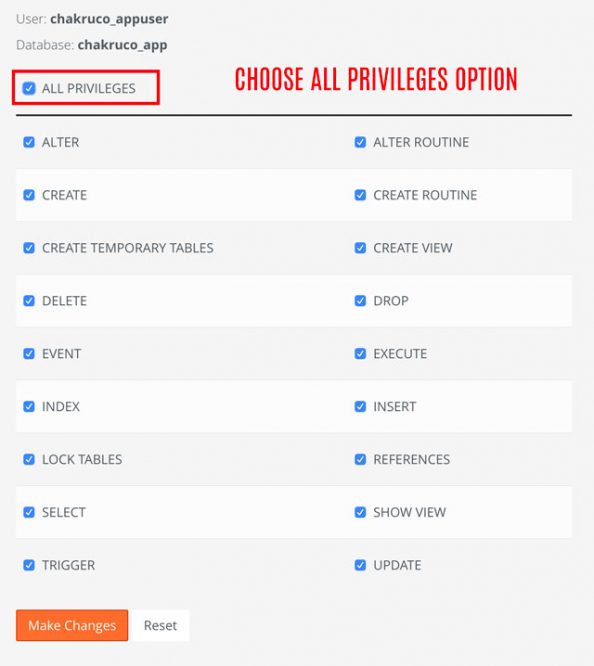
Make sure to choose the all privileges
Editing Wp-config file
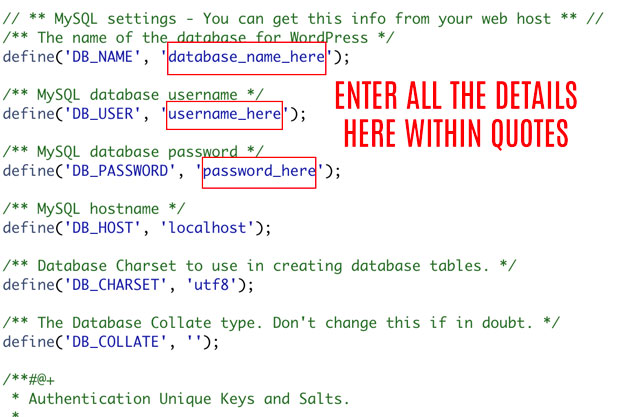
Now that you have created a database and user for the database, it is time to enter these details into the WordPress configuration file so that you can successfully install it.
Head to the file manager again and inside the location where you have the WordPress files, you should see a file called wp-config-sample.php
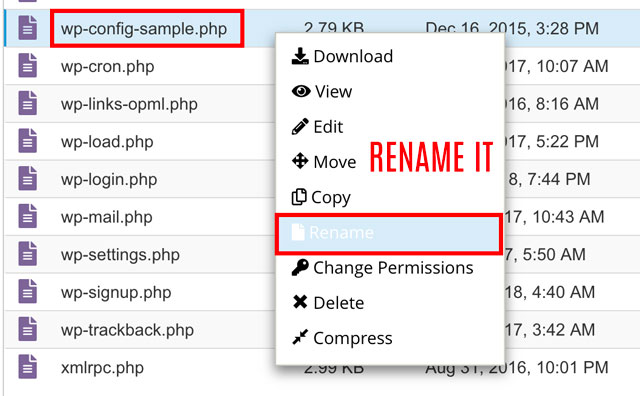
Rename this file to wp-config.php
Open the wp-config.php
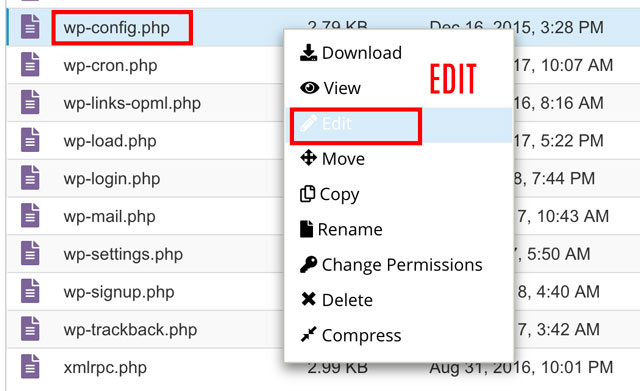
Enter the Database Name, Database username and Password for the database user and save the changes.
Installing WordPress
Once you have completed all the steps mentioned above. Open a new tab on your browser and point it to the location where you uploaded the WordPress files. You should see the installation screen.
Now it is just a matter of filling up a few details and installing the software.
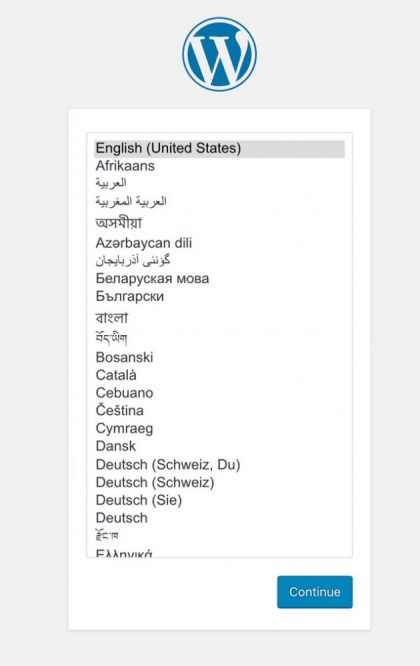
In the first screen select the language of your choice and hit continue.
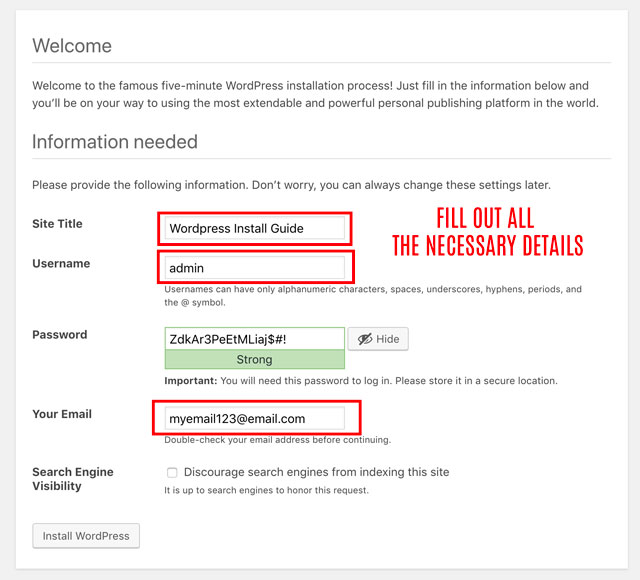
In the second screen just fill up all the necessary details and click install WordPress.
You have now successfully completed installing WordPress to your server.
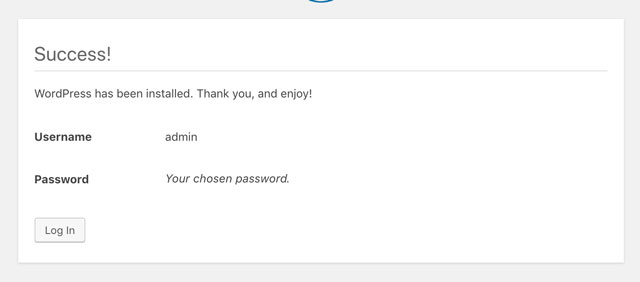
You can now start publishing articles to your blogs using the WordPress dashboard which can be accessed in this URL: http://www.yourdomainname.com/wp-admin